


I'm Mindy, all I do here is blog about circle lens reviews, make-up reviews, tutorials and other stuff.
I hope you enjoy my blog.
See you around ♡


 Instagram
Search
Follow upcoming posts

 Skinfood Black Sugar Strawberry
HERA UV Mist Cushion in #23
Aritaum Mono Eyes #Steal Away
VT Collagen Pact
Missha M Magic Cushion #23
A'Pieu Air Fit Cushion #21
Peri Pera Ink The Velvet #14
A'pieu Water Light Tint #RD03
Banila Co. CC Cream
Adaline Keep Cool Sheet Masks
Tony Moly Gel Eyeliner in brown
Jayjun Gold Snow Black Mask
Jayjun Real Water Mask
Jayjun Multi-Vita Tone Up Mask Contact

Giveaways

disclaimer
Pixel: Pixel-Diary
All reviews on this blog are 100% my own honest opinions. Photos and content on this blog are all mine unless stated otherwise. Do not use them without my permission! Keep in mind that I used precious time out of my life to work on this. Thanks! 
|
_
ヾ(^∇^) Helloo Everyone~!
Today I will show you a really simple and short hair tutorial on How to make Cat/Bear Ears! It's super cute and adorable and I really like doing this hairstyle for taking cute photos (cam-whoring) haha ♥
All you will need are bobbi pins!
Let's Start~! ( ´∀`)

STEP 1: Part you hair and grab a tiny piece of hair ( it will be your ear )

STEP 2: Braid it all the way down (even if you won't need the whole part it's better to braid it all down)

STEP 3: Secure it with a bobbi pin on your head

STEP 4: Push your Cat/Bear ear in the right place/form. Do the same thing with the other side
STEP 5: Enjoy your kawaiiness~!
I think this hairstyle is really nice if you don't have these super cute cat ear hairbands. It's a nice alternative and you can save 5 bucks
I'm not going to camwhore (annoy you with my selcas) in this post LOL
This post was so freakin short because this hairstyle is sooo simple. I would love to see photos of you doing this hairstyle you can send them to me through my email. I will be happy to see all of them~
Please leave a comment below about what you would like me to blog about! ♡
BUT anyways thanks for reading my tutorial~♥
/throws hearts at you

DO NOT USE THESE PICTURES WITHOUT MY PERMISSION OR I WILL STAB UR EYES.
Labels: bear ears, beauty, cat ear hair tutorial, cat ears, cute cat ear hair tutorial, cute cat ears, cute hairstyles, cute teddy ear hair tutorial, hair, hair tutorial, hairstyle tutorial, kawaii hairstyles, mymychen _
Hello guys~!
Here's a quick tutorial how to make those wiggly cat ears on photos. I used Song Ah Ri's picture because she's so cute. Let's make this gurrl cuter~
Start photoscape and click on Editer.
Open the picture you would like to edit and click on the 'Tools' button
 Click on Paint Brush and choose the color and brush size you would like to use to draw your cat ears. Draw cat ears on your picture 
Save this as new picture. After that repeat the steps above till you're at the Edit step again. This time you will have to click 'Obeject'. You will have to open the first picture you edited.
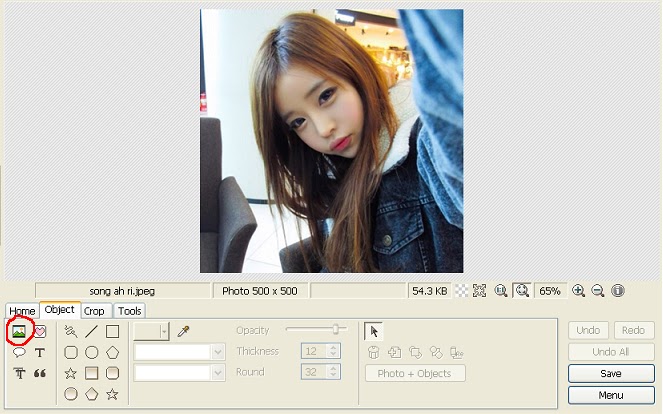
This window will appear. Adjust it to 100. The first picture with the cat ears will become transparent

Click 'Tools' again and draw cat ears in a different position again. Don't draw them exactly like in the first picture because otherwise they won't move.

Here's how I drew the second cat ears:

Click 'Object' again and click on your picture and delete the first layer . Only the second layer with the cat ears should be visible now. Save that as new picture too.

Click on Animated GIF and add the first and second pic.
Save it  
FINISH !!! ♥
 Labels: cat ears, gif, gif tutorial, photo editing, photo editing tutorial, photoscape, song ah ri, tutorial, wiggly cat ears, wiggly ears |

